
Run this before every entry: confirm the named setup, write the stop, calculate the size, set the target at a minimum 1:2 reward-to-risk, and do a five-second mental check. That sequence, done in 60–90 seconds, is your pre-trade checklist.
The minimal verbal version is three words: Setup. Stop. Size. Everything else builds from there.
Quick execution cues:
- Named setup confirmed (not "looks good," a specific pattern or structure)
- Stop placed at structural invalidation, written down before entry
- Position size calculated from risk dollars divided by stop distance
- Target set, R:R at 1:2 minimum (1:2.5 or better for A+ trades)
- Mental state neutral: no fatigue, no revenge trade, no FOMO
Print that list. Tape it to your monitor. Run it every time.
Key Takeaways
A complete pre-trade checklist — setup name, written stop, calculated size, confirmed R:R, and a clear mental state — run in 60–90 seconds before every entry, is the single most effective habit for consistent trade execution.
| Point | Details |
|---|---|
| Write it, don't think it | Writing the checklist prevents self-justifying moves like skipping the stop or oversizing. |
| 1–2% risk per trade | Calculate position size from risk dollars divided by stop distance; stay within the 1–2% guideline. |
| Grade every trade | A+ trades pass all checklist items and meet 1:2 R:R minimum; C trades should not be taken. |
| Post-trade review closes the loop | Journal every trade with setup name, R multiple, checklist score, and a one-line lesson after each session. |
| Disciplineaiapp automates the mechanical steps | The platform enforces multi-timeframe alignment, position sizing, journaling, and behavioral checks at the platform level. |
Table of Contents
- What is a pre-trade checklist and why does it matter?
- What should your pre-trade checklist actually include?
- Ready-to-use templates for day, swing, forex, and futures traders
- How to run your pre-market routine and intra-session quick-scan
- Post-trade review and journaling: close the loop
- How tools and automation can operationalize your checklist
- Disciplineaiapp can help you automate the checklist
- Sources
What is a pre-trade checklist and why does it matter?
A pre-trade checklist is a short, binary series of checks you run immediately before entering a position. Not a general trading plan, not a watchlist review — a real-time gate that stands between your analysis and your order button.
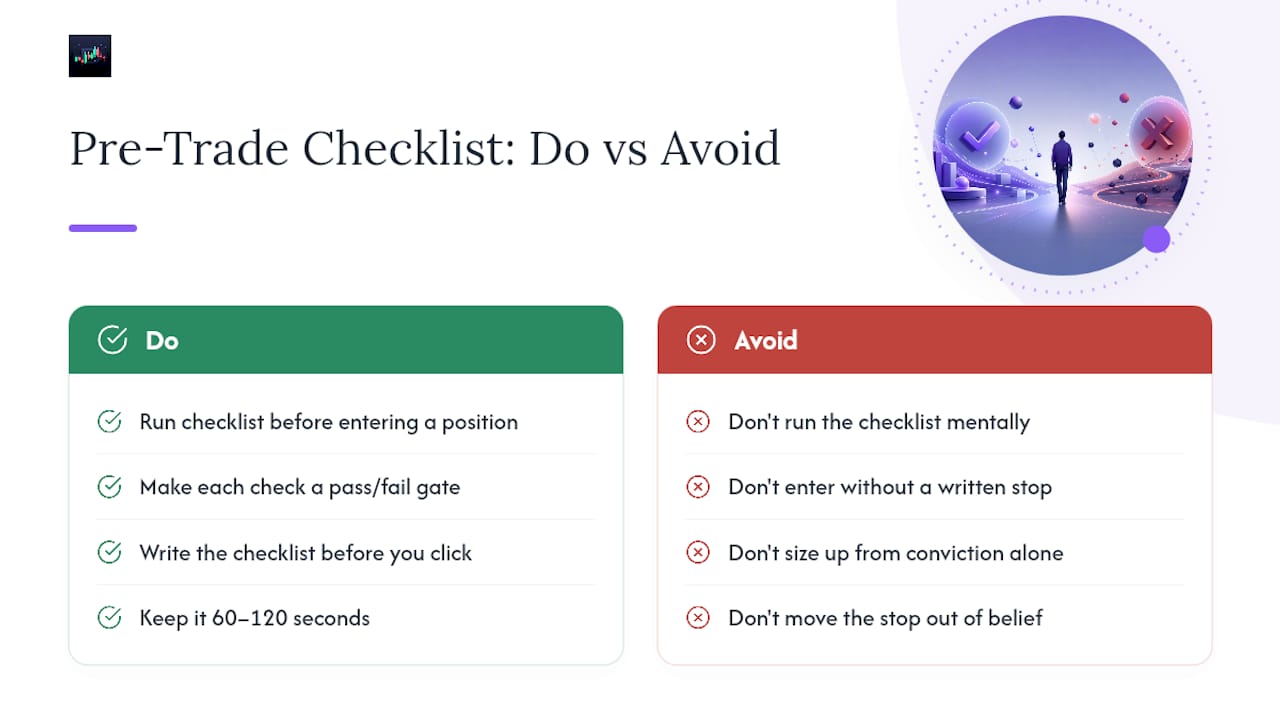
The problem it solves is specific: under time pressure, traders compress decisions. Price moves fast, the setup looks right, and the brain skips steps. You enter without a written stop. You size up because conviction feels high. You move the stop when price approaches it because you "still believe in the trade." A written checklist short-circuits all of that by making each check a pass/fail gate, not a judgment call, helping prevent errors without specifying exact times.
The analogy that holds up is surgical checklists. The World Health Organization's Surgical Safety Checklist, introduced in 2008, reduced major surgical complications by roughly 36% across eight hospitals worldwide. Pilots run pre-flight checklists for the same reason: not because they forgot the steps, but because time pressure and familiarity are exactly when errors happen. Trading is no different.
A well-built pre-trade checklist takes 60–120 seconds to run. That is the target. Longer means it is too complex; shorter means you are skipping items.
Pro Tip: Write the checklist on paper or in a notes app before you click. Thinking through it mentally allows self-justification. Writing forces commitment.
What should your pre-trade checklist actually include?
The five-item framework covers setup, invalidation/stop, size, target with R:R, and a psychological check. Here is what each item means in practice, with the math included.
1. Multi-timeframe market context
Before any entry, confirm the higher-timeframe (HTF) bias. If you trade the 15-minute chart, the 4-hour and daily charts set the context. A long setup against a daily downtrend is a C-grade trade at best. Mark HTF bias during pre-market work, not at the moment of entry.
Session fit matters too. A forex breakout setup at 2:00 AM EST during the Tokyo session has different liquidity than the same setup at the London open. Check the Federal Reserve's calendar for FOMC dates and other scheduled macro events — a 25-basis-point surprise can invalidate a technically perfect setup in seconds.
2. Named setup and structural anchor
The setup must have a name. "Looks like it might go up" is not a setup. "Bull flag retest at the 50-period EMA with a higher low structure" is a setup. The name forces specificity and makes post-trade review meaningful.
Identify the structural anchor: the support/resistance level, channel edge, or pattern boundary that defines where the trade is valid. If price is not at that anchor, the setup is not active.
3. Trigger and confirmation
A setup is not a trade until a trigger fires. The trigger is the specific price action or indicator signal that confirms entry: a candle close above resistance, a momentum cross, a volume spike above the 20-period average. Without a defined trigger, you are guessing at timing.
4. Invalidation and stop placement
Write the stop before you write the entry. Structure-based stops work better than arbitrary pip distances: place the stop below the last significant low for a long, above the last significant high for a short, or beyond the pattern's structural boundary.
The five-phase day-trading checklist treats this as a non-negotiable execution step. If you cannot identify a structural invalidation point, the setup is not ready.
5. Position size calculation
This is where most traders lose money without realizing it. The formula:
Position size = Risk dollars ÷ Stop distance
Worked example for stocks:
- Account: $25,000
- Risk per trade: 1% = $250
- Entry: $50.00, Stop: $48.50 (distance: $1.50)
- Position size: $250 ÷ $1.50 = 167 shares
For forex (standard lot = $10/pip):
- Risk: $200, Stop: 20 pips
- Lot size: $200 ÷ (20 × $10) = 1 mini lot
For futures (ES contract, $50/point):
- Risk: $500, Stop: 4 points
- Contracts: $500 ÷ (4 × $50) = 2.5 → round down to 2
The 1–2% per-trade risk guideline is the standard starting point.
6. Target and reward-to-risk
Set the target before entry. A+ trades require a minimum 1:2 R:R; the day-trading checklist standard sets 2R as the floor for full-size entries. For swing trades, 1:3 or better is realistic when the HTF structure supports it.
Define this before entry, not when price is moving.
7. Execution readiness
Check the spread. For futures, confirm the contract is not near expiry. For stocks, check pre-market volume to confirm liquidity. Know your order type: limit orders for planned entries, market orders only when the setup demands immediate execution.
FINRA's margin guidance is the reference point for U.S. traders on pattern day trader (PDT) rules and margin requirements. If your account is under $25,000 and you are trading equities on margin, PDT restrictions apply. Know your available margin before sizing.
8. Behavioral check
Three questions, five seconds each:
- Am I fatigued or distracted?
- Is this trade in my plan, or am I chasing?
- Have I already hit my daily loss limit?
If any answer is "yes" or "maybe," the trade does not happen. This is not optional.
9. Contingency plan
Decide before entry what you do if connectivity drops, if a news event gaps price through your stop, or if the platform freezes. The answers should already be written: a backup broker, a phone number for your broker's trade desk, a rule about maximum slippage you will accept. Deciding these things in the moment is how traders make expensive mistakes.
| Checklist Item | What to Confirm | Pass Condition |
|---|---|---|
| HTF bias | Daily/4H trend direction | Setup aligns with bias |
| Named setup | Specific pattern or structure | Has a defined name |
| Trigger | Entry signal defined | Signal has fired or is pending |
| Stop/invalidation | Structural level written | Stop placed before entry |
| Position size | Risk % × account ÷ stop distance | Within 1–2% risk limit |
| Target / R:R | Minimum 1:2 confirmed | Level identified on chart |
| Execution readiness | Spread, liquidity, margin | All within acceptable range |
| Behavioral check | Fatigue, FOMO, daily loss limit | All three clear |
| Contingency | Connectivity, news, slippage plan | Pre-decided actions written |
Pro Tip: Make every checklist item binary. "Does the setup align with HTF bias? Yes/No." A 10-point scoring model — where 7+ means full size, 5–6 means half size, and below 5 means no trade — removes ambiguity from the decision.
Ready-to-use templates for day, swing, forex, and futures traders
A trading plan checklist works best when it is strategy-specific. A day trader running 5-minute breakouts needs different checks than a swing trader holding for three days.
The table below gives condensed, printable templates for each style. Copy the row that fits your approach.
| Style | Pre-Trade Template (run in order) |
|---|---|
| Day trading | HTF bias ✓ → Key level marked ✓ → Reaction confirmed ✓ → Trigger fired ✓ → Stop + size written ✓ |
| Swing trading | Daily/weekly trend ✓ → Chart level identified ✓ → HTF confirmation ✓ → Overnight risk acceptable ✓ → Stop + size + target written ✓ |
| Forex | Session timing ✓ → Macro calendar clear ✓ → Spread acceptable ✓ → HTF bias ✓ → Trigger + stop + size ✓ |
| Futures | Contract expiry checked ✓ → Margin available ✓ → Session overlap liquidity ✓ → HTF bias ✓ → Stop + size + target ✓ |
Day trading specifics: The five-phase day-trading checklist — market bias, key level, reaction, confirmation, execution — is the gold standard for intraday work. All five phases must pass for a full-size A+ entry. If only three or four pass, reduce size or skip.
Swing trading specifics: Overnight risk is the variable day traders ignore. Before holding through a session close, confirm that no major earnings, economic data, or central bank decisions are scheduled overnight. Check the Fed's release calendar for FOMC and economic data dates.
Forex specifics: Session timing changes everything. The London/New York overlap (8:00 AM–12:00 PM EST) produces the highest liquidity and tightest spreads for major pairs. The forex discipline checklist covers session-specific filters in detail. Outside overlap hours, widen your spread tolerance or reduce size.
Futures specifics: Margin requirements shift with volatility. Check available margin against the exchange's current initial margin requirement before sizing. Near contract expiry, roll to the next contract or reduce exposure — liquidity thins and slippage increases.
How to run your pre-market routine and intra-session quick-scan
The two-phase approach separates preparation from decision. Preparation happens before the session; the decision phase happens in real time when price reaches a marked level.
Pre-market preparation (20–60 minutes before open)
- Read the HTF charts (daily, 4-hour) for each instrument on your watchlist. Mark bias: bullish, bearish, or neutral.
- Identify key levels: support, resistance, prior day high/low, weekly open. Mark them on the chart.
- Check the macro calendar. FOMC, CPI, NFP, and earnings dates are non-negotiable filters. If a major event is within two hours of your planned entry window, note it or skip the session.
- Set your daily risk cap. If you lose X dollars today, trading stops. Write the number before the session opens.
- Confirm platform and connectivity. Software updated, data feed live, backup plan ready.
Intra-session decision phase (30–90 seconds at the level)
When price reaches a marked level, run the short checklist:
- Is this the setup I marked pre-market? (Yes/No)
- Has the trigger fired? (Yes/No)
- Where is the stop? (Write it now)
- What is the position size? (Calculate it now)
- Mental state clear? (Yes/No)
If all five are yes, enter. If any is no, wait or skip.
Pro Tip: Scalpers and high-frequency traders should do the full preparation phase the night before or early morning, then compress the decision phase to a 30-second binary scan. The preparation does the heavy lifting; the decision phase just confirms the setup is still valid.
Post-trade review and journaling: close the loop
Every trade is data. A short, consistent journaling workflow turns that data into an edge over time. The trading plan-to-checklist connection only works if you review whether the checklist was followed and what the outcome was.
Quick journal template fields (fill in immediately after closing the trade):
- Setup name
- Entry price, stop price, target price
- Position size and risk dollars
- Outcome (win/loss, R multiple)
- Checklist pass count (how many of the 9 items passed)
- Execution notes (did you follow the plan exactly?)
- One-line lesson
Review cadence:
- Daily: Scan the journal entry. Did you follow the checklist? If not, which item did you skip?
- Weekly: Look for patterns. Are losses concentrated in one setup type? One session? One emotional state?
- Monthly: Update the trading plan. If a setup has a negative expectancy over 20+ trades, remove it or reduce size.
Grade every trade A+, B, or C based on checklist pass count. A+ trades pass all nine items and meet the 1:2 R:R minimum. B trades pass 7–8 items. C trades pass fewer than 7. The rule: A+ trades get full size, B trades get half size, C trades get no trade.
| Journal Field | What to Record |
|---|---|
| Setup name | Specific pattern or structure name |
| Entry / stop / target | Exact prices, not approximations |
| Risk dollars | Calculated position size × stop distance |
| R multiple | Outcome expressed as a multiple of risk (e.g., +1.8R) |
| Checklist score | Number of items passed out of 9 |
| Grade | A+ / B / C based on score |
| One-line lesson | Single observation about execution or setup quality |
Many platforms export trade data via CSV or API. Populate the objective fields (entry, exit, size, P&L) automatically where possible, then add the qualitative fields manually. Performance analytics that break down results by setup type and checklist grade will show you which setups actually have edge and which ones you are trading on hope.
How tools and automation can operationalize your checklist
A checklist is only as good as the friction it creates between impulse and execution. The right tools add that friction systematically.
Practical tool use-cases:
- Economic calendar filters: Set alerts for FOMC, CPI, and NFP dates so you are never caught in a macro event without warning. The Federal Reserve's release schedule is the primary source for U.S. monetary policy dates.
- Multi-timeframe alerts: Set price alerts at your pre-marked key levels so the decision phase only starts when price actually reaches the level, not when you are watching and second-guessing.
- Position sizing calculators: Most platforms include a built-in calculator. Use it every time. Manual math under time pressure produces errors.
- Stop and take-profit automation: Pre-enter stop and target orders at the moment of entry. This removes the temptation to move the stop when price approaches it.
- Journal integrations: Export trade data to a spreadsheet or dedicated journal app. Automate the objective fields; fill in the qualitative ones manually.
A process-oriented trading workflow compresses these steps into a defensible sequence: watchlist alert fires → sizing calculator confirms position → limit order placed with stop and target attached → journal entry auto-populated from the platform export. Each step is logged, auditable, and reviewable.
FINRA's investor education resources cover margin rules and broker-dealer obligations that affect how you configure stops and leverage in your platform. Know the rules before you automate around them.
On transparency: Trading tools, including AI-assisted platforms, can enforce checklist criteria, flag behavioral patterns, and surface multi-timeframe analysis faster than manual review. They do not eliminate risk or guarantee profitable outcomes. Use them to reduce friction and improve compliance with your own rules — not as a substitute for a written plan.
AI trade analysis can surface evidence for or against a setup before you click, which is exactly what the pre-trade checklist is designed to do manually. When a platform logs every check, scores execution quality, and flags behavioral drift, the checklist becomes auditable rather than aspirational.
The one rule that makes the checklist stick
The traders who actually follow their checklist long-term tend to share one habit: they treat the checklist as a physical gate, not a mental reminder. The rule is simple — if the checklist is not written or confirmed, the trade does not happen. Not "I'll do it next time." Not "I ran through it in my head." Written, checked, done.
Partial compliance is where most traders fail. They run the checklist for the first three items, feel confident, and skip the rest. That is exactly when the skipped item would have stopped a bad trade. The checklist only works as a complete sequence. A surgeon who skips the final instrument count because the operation "went well" is still running an incomplete checklist.
The enforcement mechanism is accountability: review your journal at the end of every session and mark whether the checklist was completed in full. If it was not, that trade gets a C grade regardless of outcome. A winning trade taken without a complete checklist is not a good trade — it is a lucky one, and luck does not compound.
Disciplineaiapp can help you automate the checklist
Running a pre-trade checklist manually is the right starting point. At scale, across multiple instruments and sessions, automation handles the parts that do not require judgment.

Disciplineaiapp is built for traders who want the checklist enforced at the platform level, not just on a sticky note. The app scans market structure, multi-timeframe alignment, liquidity conditions, and volatility across assets, then generates AI-scored trade setups with confidence ratings attached. Position sizing tools, automated journaling, and behavioral coaching handle the mechanical steps so your attention stays on the decision itself. The stand-aside protection feature flags sessions where behavioral drift or adverse conditions make trading inadvisable — the behavioral checklist item, automated.
Disciplineaiapp does not eliminate risk or guarantee profits. It operationalizes the checklist items that are easiest to skip under pressure. Start with the Discipline AI learning center to see how the platform maps to each step in your pre-trade routine.
Sources
Regulatory and macro references:
- The Pre-Trade Checklist - TradeOlogy Academy
- Day Trading Checklist: 5 Checks Before Every Trade (Free PDF)
- Forex-basics
- Federal Reserve
Trading education and checklist references:
This article is general information, not a substitute for advice from a qualified financial advisor. Consult a qualified financial professional about your own circumstances before acting on anything here.