
Position sizing is the math that decides how many lots you buy or sell so a single loss stays inside a percentage you chose in advance, not one your stop-loss chose for you. The formula: position size = (account equity × risk %) ÷ (stop-loss pips × pip value). Most traders risk 1% per trade, with a 1–2% band for those with more tolerance or a proven edge.
- Risk amount = account equity × risk %
- Stop distance = pips between entry and stop-loss
- Pip value = dollar value per pip for your pair and lot size
- Divide risk by (stop pips × pip value) to get lot size
Pro Tip: A position size calculator does this math instantly, but you still need to know the formula to catch a bad input before it costs you.
Key Takeaways
Position sizing controls how much a single trade can cost you, and the formula, risk amount divided by stop pips times pip value, works the same way across forex, crypto, and stocks.
| Point | Details |
|---|---|
| Use the core formula | Position size = (account equity × risk %) ÷ (stop-loss pips × pip value). |
| Keep risk small and fixed | Risk 1% per trade as a default, with a 1–2% band depending on tolerance. |
| Always round down | Round lot size down to your broker's increment to avoid exceeding intended risk. |
| Track total account risk | Cap combined open-position risk, often 3–5% of equity, especially across correlated pairs. |
| Let automation help, then verify | Disciplineaiapp auto-calculates lot size and logs each trade, but confirm pip value and margin before you click confirm. |
Table of Contents
- How Do You Calculate Position Size in Forex?
- What Should You Check Before Trusting a Position Size Calculator?
- Worked Examples: From Micro Lots to Standard Lots
- Common Position Sizing Mistakes That Inflate Risk
- Advanced Position Sizing Frameworks Worth Knowing
- A Pre-Trade Position Sizing Checklist
- Adjusting Position Size Across Multiple Open Trades
- How Leverage Affects Position Sizing and Margin
- Sizing Positions for Different Volatility Conditions
- Position Sizing as the Core of Risk Management
- Using Position Sizing to Scale In and Out of Trades
- Editorial Perspective: What the Math Actually Protects
- Automate Your Position Sizing With Discipline AI
- Frequently Asked Questions
- Sources
How Do You Calculate Position Size in Forex?
Four numbers drive every position size calculation. Get one wrong and the lot size that comes out the other end is wrong too, no matter how carefully you calculated the rest.
- Find your risk amount. Multiply current account equity by your chosen risk percentage. A $5,000 account risking 1% puts $50 on the line, not a cent more.
- Measure the stop-loss distance in pips. Count from entry to stop. If you trade near news events or wide-spread pairs, add the spread to that pip count so your real risk matches your intended risk, not a slightly larger number.
- Work out pip value. For USD-quoted pairs like EUR/USD or GBP/USD, a standard lot (100,000 units) moves about $10 per pip. Mini lots run about $1 per pip, micro lots about $0.10. For JPY pairs, the math shifts because the quote currency isn't USD: you calculate pip value in JPY, then convert to your account currency using the current USD/JPY rate.
- Apply the formula and round down. Position size = risk amount ÷ (stop pips × pip value). If the result lands between broker increments, round down to the nearest 0.01 lot (or 0.1, depending on your broker's minimum), never up.
That last step trips up more traders than any other part of the formula. Rounding up by even 0.02 lots on a $50 risk budget can quietly push your real risk to $65 or $70, and you won't notice until a losing streak makes the gap obvious.
Pro Tip: Keep a small buffer between your calculated risk and your actual account risk tolerance. Spread costs and slippage on entry almost always eat into your intended stop distance a little.
What Should You Check Before Trusting a Position Size Calculator?
A calculator needs five inputs to return an accurate lot size: account currency, account balance or equity, risk percentage, stop-loss in pips, and the currency pair or instrument you're trading. Feed it those, and tools like Myfxbook's position size calculator pull live exchange rates to handle quote-currency mismatches automatically, whether you're trading EUR/USD from a JPY-denominated account or gold against USD.
Automation removes arithmetic mistakes made under pressure, but it doesn't remove input mistakes — tools like QUANTA's automated trading bots can integrate position-sizing logic to help reduce errors further. Run these checks after every calculation:
- Does the pip value match the pair? A calculator defaulting to a generic $10/pip assumption on a JPY pair will hand you the wrong lot size.
- Did you round down, or did the tool round up by default? Check the output against your intended dollar risk.
- Is there enough free margin for the position, including your broker's leverage limits?
- Did you factor in spread on the entry side, especially on volatile pairs?
Pro Tip: Run the same trade through the calculator twice, once with your stop distance and once with stop distance plus average spread. If the two lot sizes differ meaningfully, your stop is too tight for that pair's typical spread.
Worked Examples: From Micro Lots to Standard Lots
Numbers make this concrete faster than any explanation. Here are three scenarios using the same formula, scaled across account sizes and currency pairs.
- $1,000 account, 1% risk, 50-pip stop, EUR/USD. Risk amount = $10. Pip value on a micro lot (0.01) is roughly $0.10. Position size = $10 ÷ (50 × $10 per standard lot equivalent) works out to about 0.02 lots, or two micro lots. Round down if the math lands between increments.
- $10,000 account, 1% risk, 50-pip stop, EUR/USD. Risk amount = $100. At $10 per pip per standard lot, position size = $100 ÷ (50 × $10) = 0.20 lots, or two mini lots. Ten times the account, ten times the position.
- $10,000 account, 1% risk, 50-pip stop, USD/JPY. Pip value here depends on the current USD/JPY rate rather than a flat $10 figure, since JPY is the quote currency. At an exchange rate near 150, pip value per standard lot comes out close to $6.67, meaning you'd need a larger position than on EUR/USD to spend the same $100 of risk.
Rounding down in every case means your actual dollar risk lands at or slightly under your target, never over it. That gap between "slightly under" and "slightly over" is the entire point of the exercise.
Common Position Sizing Mistakes That Inflate Risk
Most blown accounts don't trace back to one catastrophic trade. They trace back to sizing habits that quietly compound.
- The fixed-lot fallacy. Trading 0.10 lots on every setup regardless of stop distance means a 20-pip stop and an 80-pip stop carry wildly different dollar risk, even though you "kept your size consistent."
- Rounding up instead of down. It looks harmless when the difference is 0.01 lots. Across a losing streak, it's the difference between an 8% drawdown and a 12% one.
- Ignoring pip-value differences and spread. Treating every pair like it carries a flat $10 pip value, especially on JPY pairs or metals, produces sizing errors that compound with every trade.
- Using stale account balance. Sizing off yesterday's equity instead of today's, after a drawdown, keeps risk climbing exactly when it should shrink. This is one of the most common mistakes that separates disciplined sizing from guesswork.
- Letting margin availability set your size. Just because your broker's leverage lets you open a bigger position doesn't mean your risk percentage does.
Advanced Position Sizing Frameworks Worth Knowing
Fixed fractional sizing, risking a flat 1% of equity per trade, is the default for a reason: it scales down automatically during losing streaks and up during winning ones, without you touching a dial.
The Kelly Criterion calculates a theoretically optimal bet size from your win rate and reward-to-risk ratio, but full Kelly sizing is aggressive enough to produce brutal drawdowns on imperfect data. Most traders who use it at all run quarter-Kelly or half-Kelly instead.
Equity models matter once you're managing multiple positions. Core equity (balance minus funds tied up in open trades) keeps new position sizes conservative while trades are live. Total equity includes floating profit and loss, and reduced total equity discounts open profits to guard against giving them back.
- Institutional desks commonly cap risk near 1% per trade with added cluster and daily drawdown limits, a structure retail traders can copy directly.
Pro Tip: If you're unsure which equity model to use, default to core equity. It's the most conservative and the easiest to calculate by hand.
A Pre-Trade Position Sizing Checklist
Run this before every order, no exceptions:
- Confirm current equity, not last week's balance, and your chosen risk percentage.
- Confirm stop-loss distance in pips, adding spread on tight-spread-sensitive pairs.
- Calculate pip value for the specific pair, then run the formula or calculator.
- Round the lot size down, verify required margin, and log the trade before you click confirm.
How Discipline AI Applies Position Sizing in Practice
Tony, who covers position sizing and risk management for Discipline AI's blog, treats sizing as the one variable a trader controls completely, unlike win rate or market direction. The app's risk management tools calculate lot size automatically from account balance, risk percentage, and stop distance, then log the trade for post-trade review.
- Auto-calculated lot size removes the manual math error under pressure.
- Every sized trade gets journaled automatically for pattern review later.
- AI trade autopsies flag when actual risk drifted from intended risk.
A trader who sizes by feel is running a different strategy on every trade, even if the setup looks identical each time.
Adjusting Position Size Across Multiple Open Trades
Sizing one trade correctly means nothing if three correctly-sized trades combine into an account-wide risk you never approved. This is where most sizing frameworks quietly break down, because they're built for a single position, not a portfolio of them.

The fix is to track total account risk, not just per-trade risk. In practice, those pairs often move together, so a broad dollar-weakness move could hit all three stops close to the same time, turning "3% risk" into something closer to correlated 3% loss in one shot rather than three independent coin flips.
Correlated pairs deserve extra scrutiny. Two trades on economically linked instruments, gold and silver, or EUR/USD and GBP/USD, function more like one larger position than two independent ones. Some traders halve their normal risk percentage when opening a second position correlated with an existing one, specifically to keep the combined exposure inside their real risk ceiling.
How Leverage Affects Position Sizing and Margin
Leverage determines how much margin a broker requires to open a position, but it has no direct relationship to how much you should risk. That distinction confuses newer traders constantly, and it's worth separating cleanly.
A 1:500 leverage account lets you open a much larger position with the same account balance than a 1:30 account would allow.
Where leverage does matter is margin availability. High leverage means a correctly-sized, risk-based position ties up less margin, leaving more free margin as a buffer against adverse moves before a margin call. Low leverage on the same account might force a correctly risk-sized position to consume most of your available margin, which is itself a warning sign: your account may be undercapitalized for the risk-based lot size the formula is telling you to trade.
Always check required margin as a final step after calculating position size, not as the input that determines it.
Sizing Positions for Different Volatility Conditions
The same stop-loss distance means something different depending on how much a pair typically moves. A 20-pip stop on a quiet session in EUR/USD might get hit by noise alone; the same 20-pip stop during a high-volatility news window might be appropriately tight for the actual move you're trading.
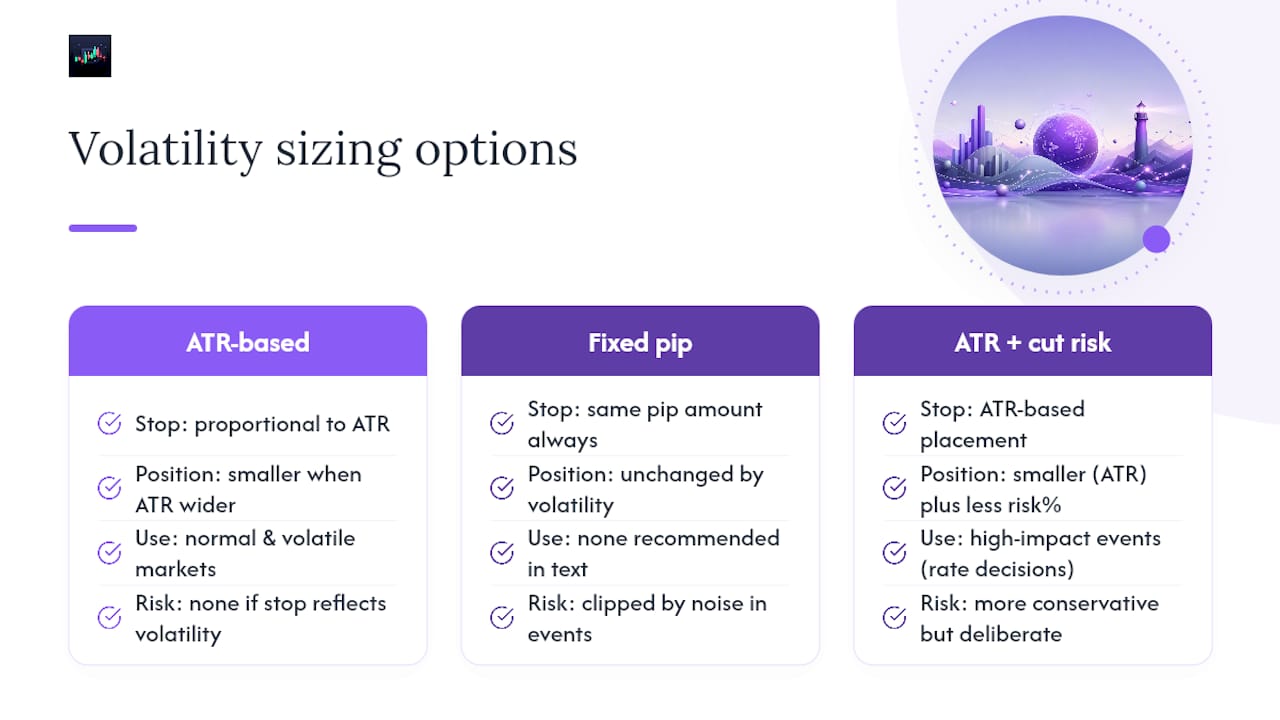
Volatility-adjusted sizing starts with the stop distance itself. Many traders use the Average True Range to set stops proportional to a pair's recent movement, which naturally widens stops in volatile conditions and tightens them in calm ones. Because position size is inversely related to stop distance in the core formula, a wider ATR-based stop during volatile periods automatically produces a smaller position size for the same dollar risk. That's the mechanism doing the work for you: you don't need a separate volatility rule if your stop distance already reflects true volatility. Our guide on ATR-based stop placement walks through the multiplier choices in more detail.
Some traders layer an additional volatility filter on top: reducing risk percentage itself, not just letting stop distance do the adjusting, during known high-volatility events like central bank rate decisions or major economic releases.
The trap to avoid is the reverse: keeping a fixed pip stop across both calm and volatile conditions. A 30-pip stop that works fine on a quiet Tuesday might get clipped by ordinary noise during a high-impact news release, turning a reasonably-sized position into a needless loss that had nothing to do with your trade thesis being wrong.
Position Sizing as the Core of Risk Management
Strategy edge gets most of the attention in trading education, but position sizing controls the ruin risk that determines whether an edge ever gets the chance to play out. A profitable strategy sized too aggressively can still blow an account during a normal losing streak; a mediocre strategy sized conservatively usually survives long enough to find out if it works.
Think of position sizing as one layer in a stack, not the whole structure. Above it sits your entry and exit strategy, deciding when to trade. Below it sits sizing, deciding how much. Underneath both sits your total risk ceiling, the account-wide cap discussed earlier that keeps correlated trades from stacking into an unintended concentration.
A complete risk management approach ties these layers together: a maximum risk per trade, a maximum combined risk across open positions, a maximum daily or weekly drawdown that triggers a pause, and a sizing formula applied consistently regardless of how confident you feel about a particular setup. Confidence is exactly the variable sizing is meant to neutralize. The trade you're most excited about and the trade you're lukewarm on should follow the identical percentage rule, because your read on a setup's quality is far less reliable than the math protecting your account if that read is wrong.
Using Position Sizing to Scale In and Out of Trades
Scaling changes the sizing question from "how big is this trade" to "how big is this trade at each stage." Instead of entering a full position at once, you split it across two or three entries, and instead of exiting all at once, you take partial profit at different levels.
Scaling in works by dividing your total intended risk across entries rather than adding fresh risk at each one. Add three separate full-risk positions instead, and you've tripled your account risk on a single idea without meaning to.
Scaling out reverses the logic on the way to a target. Closing a third of the position at a first profit level, another third further along, and letting the rest run with a trailing stop locks in partial gains while keeping the original risk-based sizing intact on the remainder. Our guide on staged entries and exits covers the mechanics of splitting size across multiple price levels in more depth.
The discipline that matters most here: track scaled positions as one combined risk figure, not several unrelated trades, or you'll lose track of your real exposure fast.
Editorial Perspective: What the Math Actually Protects
Most sizing advice fixates on the formula and stops there, as if getting the arithmetic right is the whole job. It isn't. The formula is the easy part. The harder discipline is applying the same risk percentage to the trade you're excited about and the trade you're indifferent to, without letting conviction quietly override the math.
Where conventional advice falls short is treating position sizing as a one-time calculation instead of an ongoing constraint. Traders size a trade correctly, then forget to recheck total account risk once a second and third position open. They size correctly on calm days, then keep the same stop distance through a volatility spike that makes that stop meaningless. Sizing isn't a step you complete before entry, it's a condition you maintain across the life of every open position.
If you take one thing from this, prioritize the account-wide risk ceiling over the per-trade formula. The formula gets taught first because it's easier to explain, but the ceiling is what actually keeps a string of correlated losses from becoming a blown account. Automated tools like Discipline AI help here precisely because they track combined exposure in real time, something almost no trader does consistently by hand.
Automate Your Position Sizing With Discipline AI
Disciplineaiapp turns the entire process covered above, risk calculation, pip value, rounding, and total account exposure, into an automated step instead of a manual one you have to remember under pressure.

The app calculates lot size from your account balance, chosen risk percentage, and stop distance, then logs every sized trade automatically so you can review whether your actual risk matched your intended risk after the fact. Its behavioral coaching and AI trade autopsies flag the exact pattern this article warns about most: sizing drift, where confidence on a particular setup quietly pushes risk above your own rule. For traders managing multiple open positions across forex, crypto, and stocks, that combined-exposure tracking replaces a spreadsheet you'd otherwise have to update by hand after every entry. Download Disciplineaiapp and run your next trade's sizing through it before you place the order.
Frequently Asked Questions
What is the best position size for forex trading? There's no single best size, only a risk percentage matched to your account and stop distance.
How do I calculate position size in forex manually? Multiply account equity by your risk percentage to get dollar risk, then divide that by stop-loss pips multiplied by pip value for your pair. Round the result down to your broker's minimum lot increment.
What's the difference between position sizing in forex and crypto? The formula is the same, but pip value and volatility differ sharply. Crypto pairs often lack a standardized "pip," so position sizing crypto calculations typically use percentage-based stop distance instead of pip counts, and volatility tends to run higher, which usually calls for smaller position sizes at the same risk percentage.
Does higher leverage mean I should trade bigger positions? No. Leverage affects how much margin a trade requires, not how much you should risk. Your position size should always come from the risk formula, with leverage only checked afterward to confirm you have enough free margin.
How does position sizing work when I have multiple open trades?
Sources
- Position Sizing Formulas | FX Foundations
- Position Size Calculator | Myfxbook
- How to Calculate Lot Size: Formula + 5 Examples